
Ezoic is a great Advertising partner for all publishers who solely rely on ads to monetize their blogs or websites. It is much more than just an ad partner rather it is a technology that lets publishers make more money through CPM ads.
But today we are not here to talk about Ezoic, we will discuss how to change hosts with Ezoic ads.
This will be a step-by-step guide with pictures to explain each step vividly.
One of the biggest concerns of sites with Ezoic is technical errors because if you are at a basic level and don’t have much technical knowledge then you are very far away from help.
I am at level One with Ezoic Premium access still I can’t have a direct channel to contact support. But I took it as an opportunity to learn some basics about wordpress technology (thanks to Youtube videos by many creators). I did a lot of research to find the correct way to migrate sites while being integrated with Ezoic.
A few of the major challenges or fear, while many avoid migrating to new web hosting, are
- Losing integration with Ezoic
- Website or Blog going Down
- Ads not showing
- What happens if any mishap occurs
- And many more.
But don’t worry after going through this blog post you will be confident to move any site to a new web hosting platform keeping the Ezoic integration intact.
So let’s begin with the step-by-step guide.
Background of the Migration
The site I am about to move to is workjoes.com, and the site is currently hosted on Namehero. I have had a trouble-free last 1 year with Namehero and they are very fine with Ezoic integrations and I hardly faced any downtime due to origin errors. The customer support is really fine and solves every query in time. Since my bigger sites are with Cloudways I am moving this site to the Cloudways platform.
So in a nutshell we will be moving workjoes.com from Namehero to Cloudways hosting platform and the site has Ezoic ads running. The site is integrated through nameservers.
Step-By-Step Guide to Change Hosts with Ezoic Ads
Now you have a basic idea of what we are going to do, let’s start with the guide. Before you proceed with the migration I would request you to keep these 3 things ready.
- Log-in Credentials of your WordPress Dashboard
- Cloudways Log-In credentials and
- Ezoic Account log-In Details
Keep these 3 things in hand as we are going to use them in the process.
Step-1 Log In to WordPress
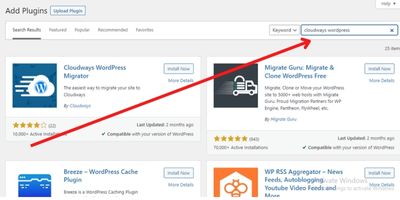
The very first step is to log in to your WordPress dashboard. Now go to the Add Plugins section and search for Cloudways WordPress Migrator. It will prompt a few results and look for the plugin displayed in the image by Cloudways.
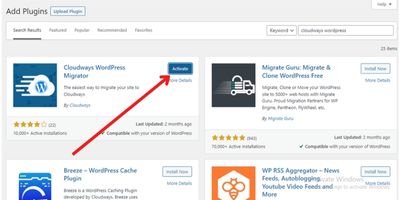
Now once you located the right plugin, Click on Install and then activate the plugin.
Step-2
Once you activate the plugin it will take you to a welcome page where you have to enter an email Id. You can choose any email Id and this email will be used to send all the migration-related information. So type in any email Id and click agree to the terms and conditions checkbox and click on Submit.
Cloudways supports sending two emails for the whole migration process to the email Id you submit. The first email is an intimation of the start of the migration process through their Migrator Plugin.
The second one is when the migration is complete.
💡Please note the time taken for migrating a site depends on the size of the website, cache or CDN plugins, speed optimization plugins, etc. It can roughly take 1-4 hours.
Also Read
How to Create a Digital Portfolio for Students?
Step-3
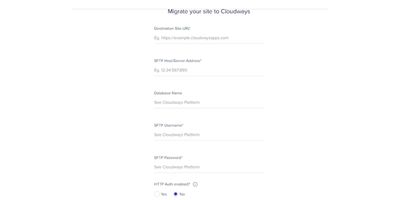
Once submitted it would take you to the next screen where it will ask for some information to go ahead with the migration process. Each section has been highlighted in the below images and we will tell you where to get them.
Step-4
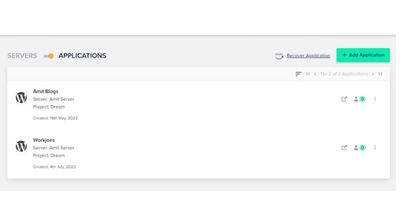
The next step is to log in to your Cloudways account and go to the application’s dashboard. Refer to the image below. Now we have to create a new application for our incoming website.
Step-5
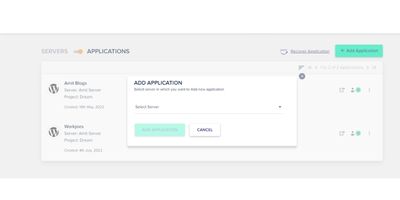
Click on Add application and it will ask you to choose the server. If you have a single server listed you can select it. If you have multiple servers then select the one where you want the website to be hosted.
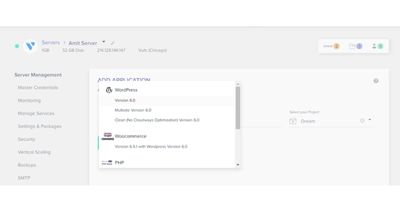
It will ask you to choose an application, since our blog is on wordpress, we will choose wordpress 6.0.
You can select the type of application depending upon the CMS(content management system) of your website. You can choose Woocommerce, wordress+ Woocommerce, Magento, Laravel, PHP, and many more.
Give a name to the application and click on add application. You can give any name like the name of your website to identify the application easily if you have a bunch of sites.
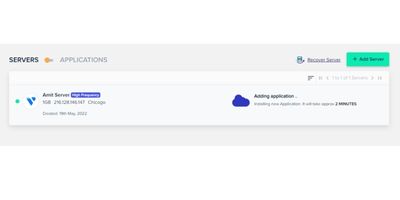
Now click on add application and It will take approximately 2 minutes to add your application.
Once your application is created you can view it in the application’s dashboard, you will see a new application in the name you chose.
Also Read
How do Colors affect Our Mood and Productivity at Work?
Step-6
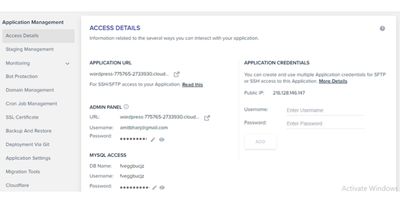
The next step is to click on the application and it will open up all the relevant information about the application like Application URL, Database name, IP address, etc.
Now fill in all the relevant details as asked in the migrator plugin.
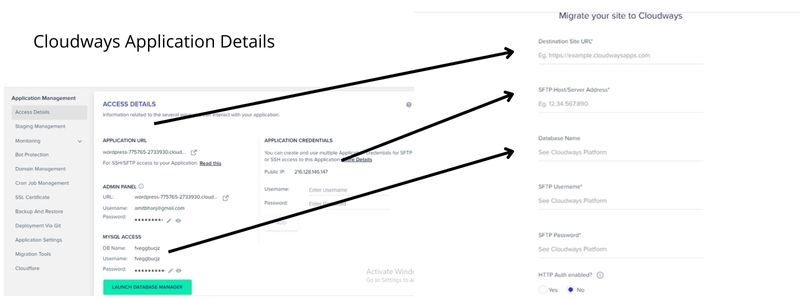
- Enter the Application URL in the first field which is the Destination Site URL.
- Enter the IP Address in the SFTP Host/Server address
- Enter the Database name.
But there are 2 more pieces of information that you will get in the Server master credentials.
Step-7
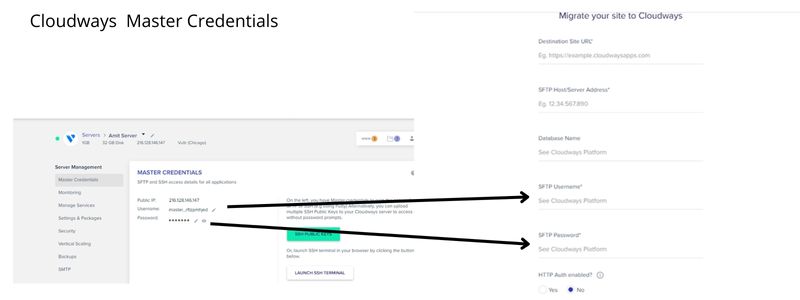
Click on the server and it will display the master credentials. Copy the SFTP username and SFTP password and paste them into the migrator plugin forms.
There are a few radio buttons below all the information and keep them as they are no need to make any changes.
Step-8
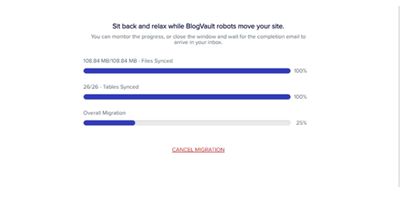
Now click on migrate and it will verify all the details and if they are correct it will automatically start the migration process. You can check the progress of the migration as shown on the migration process page. Once completed it will notify you.
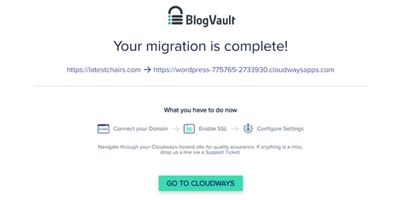
Now the migration process is completed.
But how do you check if the data is correctly migrated? Click on the temporary URL as shown here and you will find the exact copy of your site. But before you proceed on to the next step check these few things
- Check if all the post links are working
- Check if all the Page URLs are working
- Check the images are displayed properly
- All menu is working, etc.
Step-9
Once the migration process is completed we have to 2 important things,
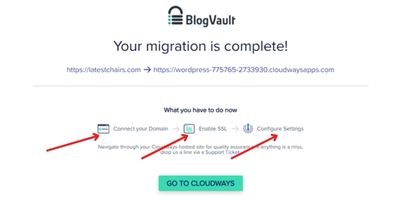
- Connect the domain to the temporary URL
- Enable SSL certificate
Open the newly added application and you will find domain management on the left-hand side of the menu. Click on domain management. Now you have to assign the domain name to it.
1. Assign Domain Name
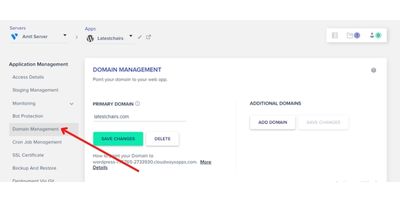
Just write the domain name of your blog or website without any prefix like HTTP or www. Now click on save changes and it will take 1-2 minutes to connect the domain to the destination application URL. Once completed click on the temporary Url and it should take you to your blog. If it is now redirecting to your website that means your domain is successfully connected.
2. Activate SSL Certificate
Now it is time to activate the SSL certificate but the domain is not pointing to the correct IP address. The domain is still pointing towards your previous hosting provider i.e. Namehero in our case.
Step-10
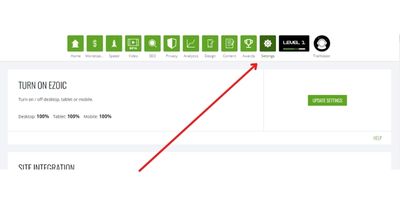
So log in to your Ezoic dashboard and select the website if you have multiple sites connected. Now jump to the settings page and scroll to the bottom to find the DNS settings section.
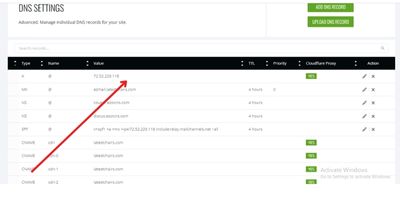
The next step is to edit all the IP addresses with the new IP address of Cloudways. You have already used the IP address while migrating and now we will use the same IP address to update in Ezoic.
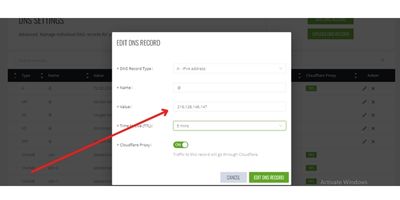
Click on the edit button (looks like a pen) and enter the new IP address. Choose 5 minutes in the time to live (TTL) section and click on edit DNS record.
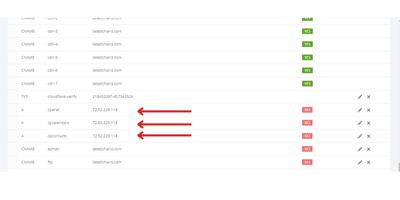
Now repeat the same process for all the IP addresses as shown in the image. Edit each and every section where the IP address is there, and replace the old Namehero IP address with the new Cloudways IP address.
Once all is completed, it is time to go back to our Cloudways account.
Step-11
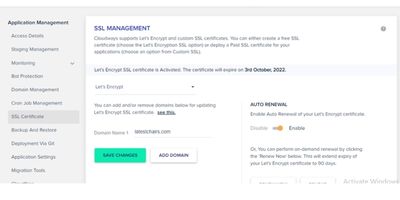
This time we will activate the SSL certificate for the blog. Type in the email Id and domain name and click on save changes. It will take a few seconds to generate an SSL certificate for the blog. The SSL certificate will renew automatically every 90 days. Make sure the auto-renewal button is enabled(as shown in the image above.
Now the process of migrating a site/blog is completed. But if you’re thinking about how to check if the site is mitigated or not then we can check so but doing this.
- First, we have to check the wordpress log in credentials if they are working as usual then it’s fine. It is the old credentials that you were using before not the new ones displayed on your Cloudways account.
- Second, click on the individual application and choose to monitor, if you see traffic coming to your site then the migration is a success.
Conclusion
So this is how you can migrate a site to another web hosting with Ezoic ads on it. This guide also covers if you want to migrate a site to Cloudways.


Image not showing properly.
Please guide me better I have WordPress blog site my domain name and hosting on hostinger
My website monetized with ezoic through cloudflare integration.
I want to move on cloudway
I don’t know where I want to edit dns or ip address etc
As I know I think
I need to update new IP address of cloudways in hostinger dns records and ezoic dns records section also am I right ????
I need to put and replace old IP address with new cloudways up address in my cloudflare account ????
Please reply please
No, you just need to update the DNS records at Ezoic, because your DNS recotds are managed by Ezoic now. Login to your Ezoic dashboard and go to settings. If you have multiple domains then dont forget to choose the correct domain. Then click on the BNS on the left pan and change the Nameservers as directed. If you still need help mail me at admin@workjoes.com