A premium workspace makes you feel like a true professional. However, hiring a contractor to build a custom home office can cost thousands of dollars.
Traditional desks are often big and bulky. They take up too much floor space and make small rooms feel cramped. But you do not have to settle for a cramped room. You can achieve the seamless, flush look of a modern home office without the high price tag.
You can build your own “fake built-in” floating desk for under $100. This clever design frees up your legroom, looks incredibly expensive, and takes less than an afternoon to build. Here is how to do it.
Key Takeaways
- You can build a custom, high-end floating desk for under $100 using basic hardware store materials.
- A floating desk removes bulky legs, making small rooms look much bigger.
- You must anchor your desk to the wall studs to make sure it is safe and strong.
- A hidden fabric hammock is the cheapest and best way to hide messy cables.
- This simple DIY project takes only one afternoon to finish.
Floating Desk for Under $100: A Stylish Solution
1. Why a Floating Desk is the Ultimate WFH Space Hack
A floating desk mounts directly to your wall. It has no legs. This is the ultimate WFH (work-from-home) space hack for a few reasons:
- More Visual Space: When you remove desk legs, you see more of the floor. This simple trick tricks your brain into thinking the room is twice as big.
- Perfect Ergonomics: A custom build lets you choose the exact height for your desk. You can match it perfectly to your office chair. This prevents neck and back pain.
- A Premium Look: A flush, wall-to-wall wood top looks expensive. It changes a cluttered “spare bedroom” into a dedicated executive office.
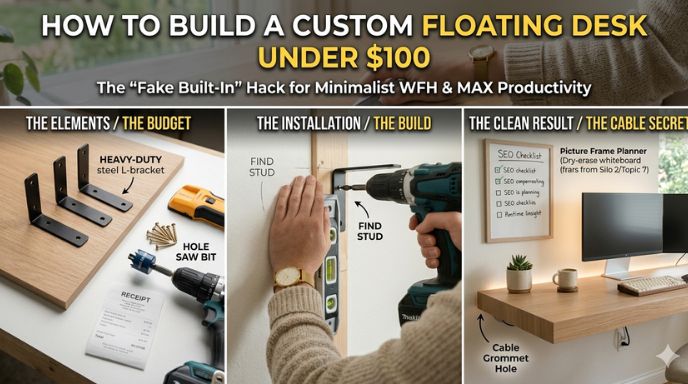
2. The Under-$100 Material List
You can find everything you need at your local hardware store or online. Here is your shopping list:
- The Desktop ($50-$70): Buy a solid wood project panel or a cheap butcher block countertop.
- The Supports ($15-$20): You need heavy-duty steel L-brackets. Make sure they are rated to hold at least 500 lbs. [Insert Affiliate Link]
- The Anchor System ($5): Buy heavy-duty wood screws. You will use these to attach the brackets to the wall studs. [Insert Affiliate Link]
- Tools Needed: You will need a power drill, a stud finder, a level, and a hole-saw drill bit.
Optional idea: If you want drawers, you can put a cheap thrift-store dresser or an IKEA Alex drawer unit under one side of the desk.
3. Step-by-Step: Building Your Custom Floating Desk
Building the desk is simple, but you must do it right so it does not fall.
Step 1: Finding Your Studs and Setting the Height
The golden rule of floating desks is safety. Never attach a heavy desk just to the drywall. You must attach it to the wooden beams inside your wall. These beams are called studs.
Use a stud finder to locate them and mark them with a pencil. According to experts at This Old House, wall studs are usually spaced 16 inches apart. Next, measure your perfect desk height. Most comfortable desks sit 28 to 30 inches from the floor.
Step 2: Mounting the Heavy-Duty Brackets
Hold your steel L-brackets against the pencil marks on your wall. Use your level to make sure they are perfectly straight. If your brackets are crooked, your pens and coffee will roll off the desk. Drill your wood screws through the brackets and deep into the wall studs.
Step 3: Securing the Wood Top
Place your wood panel on top of the strong steel brackets. Crawl under the desk. Use your power drill to drive short screws through the bracket holes and up into the wood top. Be careful! Do not drill all the way through the top of the desk.
Need a visual guide for the brackets? Check out this helpful video:
4. The Cable Management Secret: The Fabric Hammock
A floating desk looks terrible if a waterfall of black wires hangs down the wall. You need to hide them.
Instead of buying expensive plastic cable trays, use a simple piece of black fabric or an old T-shirt.
First, use your hole-saw drill bit to cut a round hole in the back corner of your desk. Drop all your monitor cords and power strips through the hole. Next, staple the black fabric directly under the desk, right below the hole. This creates a hidden “fabric hammock.” The hammock catches and hides every single wire.
If you want more tips on placing your monitors and hiding wires, read our full guide on The Ultimate WFH Desk Setup for Maximum Productivity.
5. Styling Your New Built-In Workspace
Now it is time for the finishing touches. Sand the edges of your wood top so they are smooth. You can apply a cheap wood stain or a clear coat. This protects the wood from hot coffee mugs and water spills.
Finally, add some lighting. You can stick a cheap LED light strip behind the back edge of the floating desk. This creates a soft, glowing halo effect against the wall, similar to the sleek lighting you might see on a luxury media wall.
Conclusion & Next Steps
You do not need to spend thousands of dollars to get a professional workspace. For less than $100, you have just built a custom architectural feature. It makes your home look better and helps you get more work done.
Take a photo of your new DIY floating desk and share it in the comments below! Once your desk is ready, check out our guides on the best gig economy apps so you can start making money in your new office.
Frequently Asked Questions (FAQ)
How much weight can a DIY floating desk hold?
If you anchor it properly into the wall studs using heavy-duty steel L-brackets, it can easily hold 150 to 300 lbs. This is plenty of strength for dual monitors, a heavy computer, and your arms resting on top.
Do I need power tools to build a floating desk?
Yes, you will need a basic power drill to drive the heavy screws into the wall studs. However, you do not need a saw. Most hardware stores will pre-cut your wood top to your exact size for free.
Can I build a floating desk in an apartment?
Yes, you can. Just remember that you will be drilling large holes into the wall studs. You will need to patch those holes with spackle and paint over them before you move out to get your security deposit back.